Your Bottle Feeding Setup: Everything You Need for Stress-Free Feeds
The complete, no-fluff guide to setting up your bottle feeding station, from sterilisers and brushes to the bits nobody thinks to mention.
There is a very specific moment, usually around 36 weeks pregnant or the night before your due date, when you look at the pile of bottle feeding bits on your kitchen worktop and think: "Do I actually have everything I need, or am I going to be googling 'how to sterilise a bottle' at 4am with a screaming baby?"
If that thought has already crossed your mind, you are in exactly the right place. And if it hasn't, bookmark this page, because it will.
Whether you are planning to formula feed from day one, combination feeding, or exclusively pumping, the basic bottle feeding setup is the same. The good news? It is simpler than the internet makes it look. The slightly annoying news? There are a handful of unglamorous items nobody mentions until you need them at midnight on a Sunday.
This is your honest, no-filler checklist for getting your bottle feeding station ready before baby arrives.
The Bottles Themselves
Start with six to eight bottles. That might sound like a lot, but newborns eat roughly every two to three hours, and you really do not want to be washing and sterilising mid-feed because you have run out.
A quick note on sizing: most parents buy a mix of smaller bottles (150ml) for the early weeks and larger ones (260ml) for when feeds get bigger. Some brands sell starter sets with both sizes included, which saves you the maths.
As for which brand? Honestly, the one your baby likes. You will hear passionate arguments for every bottle on the market, but the truth is that some babies are fussy about teat shape and flow rate and some could not care less. If you are buying before baby arrives, pick one brand and get a small set. If it works, brilliant. If not, try a different teat shape before binning the whole lot.
One thing worth checking: make sure the bottles you choose are compatible with your steriliser. Most are, but the occasional wider-necked design can be a squeeze.
Sterilising: Your Three Options
Every bottle, teat, and ring needs sterilising before use for at least the first twelve months. You have three main methods, and all are perfectly safe. The right choice comes down to your kitchen setup and how much faff you can tolerate.
Microwave steam steriliser. Fastest option. You add water, pop it in the microwave, and everything is sterile in about five minutes. They are compact, affordable, and the one most parents end up using daily. The only downside is that you need a microwave, which sounds obvious but catches people out if theirs is a small countertop model.
Electric steam steriliser. Same principle, no microwave required. They sit on your worktop, plug in, and do the job in around eight to twelve minutes. Some hold up to eight bottles at once, which is genuinely handy. They take up more counter space, but if you are doing multiple feeds a day, the convenience is real.



Cold water sterilising. Drop a tablet into a container of water, submerge everything, and wait 15 to 30 minutes. No electricity, no heat, no special equipment. Brilliant for travelling or as a backup. The tablets last ages and take up virtually no cupboard space.
Whichever method you pick, the process is the same: wash the bottles first (more on that in a second), then sterilise. Rinsing alone is not enough. The washing gets the milk residue off; the sterilising kills the bacteria.
Bottle Brushes: The Unsung Hero
A dedicated bottle brush is one of those things you do not think about until you are trying to clean dried formula out of a narrow bottle neck with a regular washing-up sponge. It does not work. Ask anyone who has tried.
You need a brush with bristles long enough to reach the bottom of the bottle and a smaller teat brush for getting inside the teats. Some sets come with both, which saves a separate purchase.

Silicone brushes are worth considering if you are using plastic bottles, because they are less likely to scratch the surface. Scratches can harbour bacteria, which defeats the whole point of all that sterilising you are doing.
Replace your bottle brush every couple of months, or sooner if the bristles start looking tired. They are cheap and it is not worth the risk of a worn brush leaving residue behind.
A Drying Rack (Not Your Dish Rack)
Regular dish racks are fine for plates. They are terrible for bottles. Teats fall through the gaps, rings roll off, and the whole thing ends up in a damp, chaotic pile.
A dedicated bottle drying rack keeps everything upright, separate, and draining properly. The vertical styles with pegs are brilliant because bottles, teats, caps, and rings each get their own spot. You can see at a glance what is clean and dry, which matters more than you think when you are running on three hours of sleep.
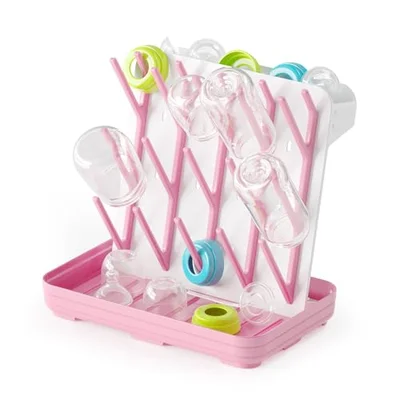
Place it somewhere it can stay permanently. You will be using it multiple times a day for months, so it earns its worktop real estate.
Bottle Warming: Do You Actually Need a Warmer?
Short answer: no, you don't need one. Plenty of babies drink room-temperature or even cool formula perfectly happily. Some actually prefer it, especially in warmer weather. If your baby is unbothered by temperature, you have just saved yourself a purchase and a plug socket.
But some babies are very particular. If yours will only drink a warm bottle, a dedicated warmer takes the guesswork out of heating it to the right temperature without creating hot spots. You can also warm a bottle by standing it in a jug of hot water for a few minutes, which works fine but takes longer and requires more attention.
If you are pumping and storing breastmilk, a warmer is genuinely useful. Breastmilk should never go in the microwave (it destroys some of the good stuff and can heat unevenly), so a gentle warmer or warm water bath is the way to go.
The Bits Nobody Tells You About
These are the items that will not appear on most baby registry checklists but that you will absolutely need at some point. Consider this your secret advantage.
A formula dispenser or pre-measured pots. For night feeds and outings. You pre-portion the formula powder so you can just tip it into the bottle and add water. No fumbling with scoops in the dark. No spilling powder everywhere. Life-changing for 3am feeds.
A small washing-up bowl. Sounds odd, but having a dedicated bowl for bottle washing keeps everything separate from your regular dishes. Some parents use this at the sink; others keep it on the worktop next to their prep area. Either way, it makes the whole process feel less like it is taking over your kitchen.
Spare teats in the next size up. Babies outgrow teat flow rates, and when they do, feeds suddenly take forever and they get frustrated. Having the next size ready means you are not panic-ordering at 9pm on a Tuesday. Most brands use a numbered system: size 1 for newborns, size 2 from around three months, and so on.
A good flask. If you are making feeds on the go, a vacuum flask filled with hot water is your best friend. Boil the kettle, fill the flask, and you have got water at the right temperature for hours. Much simpler than trying to find somewhere to heat water when you are out and about.
Setting Up Your Station
Once you have got all the bits, here is how to arrange them so the whole operation runs smoothly.
Pick a spot in your kitchen near the kettle and the sink. You want your steriliser, drying rack, and formula within arm's reach. This becomes your bottle station, and trust us, having everything in one place makes midnight feeds infinitely less stressful.
The flow should be: wash at the sink, sterilise, place on drying rack, make up feed. If you can set this up before baby arrives, you will thank yourself during that first hazy week at home.
A few practical tips that genuinely help:
- Keep a clean muslin or tea towel near the station for wiping your hands (you will always have damp hands)
- Store formula at eye level so you can read the scoop measurements without bending down while holding a baby
- Put a small bin or container nearby for used bottle liners, if you use them
- If your worktop space is limited, a kitchen trolley on wheels works brilliantly as a mobile bottle station
How to Make Up a Bottle Safely
This is the one bit where precision actually matters, so here is the process step by step.
Boil fresh water in the kettle and let it cool for no more than 30 minutes. You want it at least 70 degrees to kill any bacteria in the formula powder. Pour the water into the bottle first, then add the powder. Adding powder to water (not the other way around) gives you an accurate measurement.
Scoop the powder using the scoop that came with your formula tin. Level it off with a clean knife or the leveller on the tin, not by tapping or packing it down. Each scoop should be flat, not heaped.
Cap the bottle, swirl gently (do not shake hard, as this creates air bubbles that can cause wind), and cool it under cold running water until it is body temperature. Test it on the inside of your wrist. If it feels warm but not hot, it is ready.
Ideally, make feeds fresh each time. If you need to make them in advance, cool them quickly and store in the back of the fridge (not the door) for a maximum of 24 hours. Warm a fridge-stored bottle gently before feeding.
Your Bottle Feeding Checklist
Here is everything in one tidy list so you can check it off without scrolling back up:
- 6-8 bottles in a mix of sizes (150ml and 260ml)
- Extra teats in the next flow size
- A steriliser (microwave, electric, or cold water tablets)
- A bottle and teat brush set
- A dedicated drying rack
- Washing-up liquid suitable for baby items
- A formula dispenser or pre-measured pots
- A vacuum flask for outings
- A bottle warmer (optional, depending on your baby's preferences)
- A small dedicated washing-up bowl
- Muslins, because everything involves muslins
That is genuinely it. No fancy gadgets, no expensive extras. Just the stuff that works.
One Last Thing
However you are feeding your baby, whether it is formula, expressed milk, or a combination, you are doing a brilliant job. Bottle feeding has its own rhythm and its own quiet intimacy, and once your setup is running smoothly, those feeding moments become some of the loveliest parts of your day.
If you would like to create a wishlist with all your feeding essentials in one place, you can set one up on BubsNest. It is free, takes about two minutes, and means well-meaning relatives actually buy you something useful instead of yet another stuffed giraffe. 🦒
Ready to Create Your Baby Registry?
Start your free baby registry today and share it with friends and family.
Get Started Free