Setting Up for Bottle Feeding: The Gear That Actually Matters
Everything you need for bottle feeding, from choosing bottles and sterilising to the small stuff that makes 3am feeds slightly less chaotic.
You are standing in the baby aisle, staring at a wall of bottles. There are anti-colic ones and glass ones and ones with special vents and ones shaped like actual breasts. There are teats labelled slow flow, medium flow, variable flow, and something called "natural flow" which sounds lovely but tells you precisely nothing. You have been here for twenty minutes and your basket is still empty.
Sound familiar? You are not alone. Bottle feeding gear is one of those categories where the sheer number of options makes the whole thing feel ten times more complicated than it needs to be. So here is the honest version: what you actually need, what you can skip, and the few bits of kit that will genuinely make your life easier when you are doing the 2am feed with one eye open. 🍼
How Many Bottles Do You Actually Need?
If you are exclusively bottle feeding (whether with formula or expressed milk), you will want between six and eight bottles. That gives you enough to get through a full day without having to wash and sterilise between every single feed. Because trust me, washing bottles at 4am is nobody's idea of fun.
If you are combination feeding, topping up breastfeeds with the occasional bottle, three or four will do. Start small and buy more if you need them. Babies can be surprisingly fussy about which bottle they will accept, so committing to twelve of the same brand before your baby has even tried one is a gamble you do not need to take.
Top tip: buy two different brands to start with. Try both. Let your baby cast the deciding vote.
Anti-Colic, Glass, or Standard: Picking Your Bottles
This is where it gets noisy. Every brand claims their bottle is the closest to the breast, reduces colic, and basically does everything except the night feed for you. Here is what actually matters.
Anti-colic bottles have a vent system designed to reduce the amount of air your baby swallows during a feed. If your baby is windy, colicky, or pulling off the bottle and crying mid-feed, anti-colic bottles can make a genuine difference. They are not magic, but they are worth trying before you spend a fortune on colic drops.
Glass bottles are making a proper comeback. They are heavier than plastic, yes, but they do not stain, do not retain smells, and last forever. If the idea of heating plastic makes you uneasy (even BPA-free plastic), glass is a solid alternative. Most come with silicone sleeves now, so they are less smash-prone than you might think.

Standard bottles are perfectly fine for most babies. If your little one is not showing signs of colic or wind issues, a straightforward bottle with a good teat will do the job brilliantly. Do not let anyone make you feel like you need the fanciest option on the shelf.
A Quick Word on Teats
Teats come in different flow speeds: extra slow, slow, medium, and fast. Newborns need extra slow or slow flow. If your baby is gulping, choking, or milk is dribbling out the sides of their mouth, the flow is too fast. If they are getting frustrated and giving up mid-feed, it might be too slow.
Most bottles come with a newborn teat included. You will likely need to size up around 3 to 4 months, but your baby will let you know when it is time.
Sterilising: Three Methods, One Goal
Until your baby is at least 12 months old, everything that touches their milk needs to be sterilised. That means bottles, teats, caps, and any breast pump parts if you are expressing. It sounds like a big job, but once you find your method, it becomes pure autopilot.
Electric steam sterilisers are the most popular option. Pop everything in, press a button, done in about five minutes. They sit on your worktop and become part of the furniture within a week.
Microwave sterilisers do the same thing but use your microwave instead. Cheaper upfront, takes about the same time, and works brilliantly if you do not want another appliance on the counter.
Cold water sterilising uses tablets or liquid dissolved in water. You soak everything for at least 15 minutes. It is the cheapest option and brilliant for travel, since all you need is a container and the tablets.
If you want to skip the steriliser entirely, there is always the boiling water method. Submerge everything in a pan of boiling water for at least 10 minutes. It works, but it is the least convenient option for daily use.
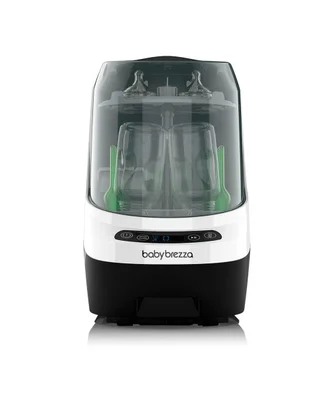
For parents who want the washing and sterilising handled in one go, a dedicated bottle washer is a genuine game-changer. It cleans, sterilises, and dries everything in a single cycle. Yes, it is an investment, but if you are doing eight or more bottles a day, the time it saves is enormous.
Warming Things Up (Or Not)
Here is a secret that will save you both money and stress: babies do not need warm milk. Room temperature is absolutely fine, and some babies are perfectly happy with milk straight from the fridge. If your baby will take it cool, you have just eliminated an entire step from every feed. Test it before you buy a warmer.
If your baby does prefer warm milk (and many do, especially breastfed babies transitioning to a bottle), you have a few options.
A jug of warm water is the low-tech solution. Stand the bottle in it for a few minutes. Free, effective, and requires zero counter space. The downside? It takes a while, and at 3am, "a while" feels like an eternity.
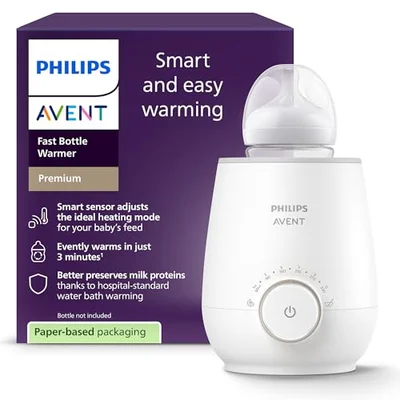
An electric bottle warmer heats milk to the right temperature in a few minutes, with no guesswork. The smart ones will stop automatically so there is no risk of overheating. They are especially useful for night feeds when your brain is operating at about 15% capacity.
A formula prep machine is the premium option. It makes a fresh bottle at the perfect temperature in about two minutes. If you are exclusively formula feeding, plenty of parents swear this is the single best purchase they made. It takes the faff out of cooling boiled water and measuring scoops at silly o'clock.
Whatever method you choose, always test the temperature on your inner wrist before feeding. It should feel lukewarm, not hot.
The Small Stuff That Makes Life Easier
There are a handful of extras that do not get much attention but quietly make the whole bottle feeding routine smoother.
- A bottle brush with a teat brush attached. You will use this multiple times a day. Get a good one with stiff bristles that actually reaches the bottom of the bottle. Silicone brushes are great because they do not harbour bacteria.
- A drying rack. Sounds boring. Is essential. You need somewhere for all those freshly sterilised parts to drain and dry without getting contaminated. A dedicated rack beats a tea towel every time.
- A formula dispenser for days out. If you are formula feeding, a compartment dispenser lets you pre-measure your scoops and tip them into the bottle when you need them. Far less stressful than trying to count scoops in a noisy cafe with a screaming baby.
- Spare teats. They wear out, they split, and your baby will eventually chew through them. Keep a spare set in the cupboard so you are never caught out.
The Bit Nobody Mentions: It Gets Easier
The first week of bottle feeding feels like an endless cycle of washing, sterilising, making up, warming, feeding, burping, and starting again. It is relentless. But within a fortnight, you will have your system down. You will batch-sterilise without thinking about it. You will make a bottle one-handed in the dark. You will know exactly which teat flow your baby likes and how warm they want their milk.
And then one day you will realise you have not thought about bottles for a single conscious second all morning, because it has become completely automatic. That is the goal. The right kit just gets you there faster. 💛
Want to get your bottle feeding setup sorted in one place? Pop everything onto your BubsNest wishlist and let friends and family help out with the bits you need most.
Ready to Create Your Baby Registry?
Start your free baby registry today and share it with friends and family.