Roll, Stack, Ribbon: How to Make a Nappy Cake for a Baby Shower
A step-by-step guide to building a nappy cake that looks gorgeous on the gift table and is genuinely useful once the party is over.
A three-tier nappy cake uses somewhere between 40 and 60 nappies. For a newborn, that's the best part of a week's supply, sitting on the gift table dressed up as a showstopper. 🎂
That's the magic of it. It's a centrepiece, a talking point and a properly practical present all at once. Nobody has ever been sad to receive a week of nappies, and nobody has ever walked past a nappy cake without saying "oh, did you make that?"
The good news is that it's far easier than it looks. No baking, no skill, no special equipment. Just an evening, a cup of tea and a bit of patience with elastic bands. Here's how to build one, step by step.
Step 1: Check with the parents-to-be (sneakily)
Before you buy a single nappy, do a little detective work. Are they planning to use cloth nappies? Do they have a brand they've already stocked up on? Is the baby expected to be on the larger side?
If you're not sure, ask whoever's hosting, or take a peek at their wishlist. If they've built one on BubsNest, you'll often see exactly which nappies and toiletries they've picked, which takes all the guesswork out of it.
And if they're going fully cloth? A nappy cake made of disposables isn't the kindest gift. Swap to rolled muslins and washcloths instead (more on that below).
Step 2: Choose the right nappies
Here's the tip most first-time cake makers miss: go for size 2, not newborn or size 1.
Plenty of parents will already have a stash of tiny nappies ready for the hospital bag, and lots of babies outgrow the smallest size within a few weeks. Size 2 buys them breathing room. Those nappies will still be useful a month or two in, when the baby gifts have dried up and the nappy bill hasn't.
Plant-based or sensitive-skin nappies are a lovely choice for a gift, too. They feel a little more special than the everyday pack, and they're kind to brand-new skin.
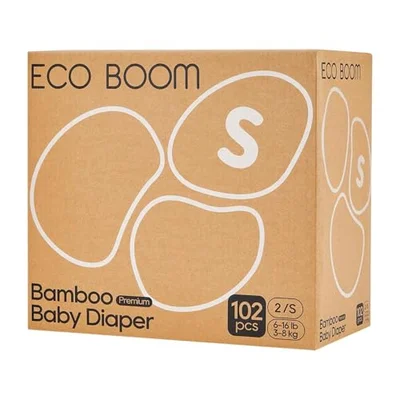

A pack of around 100 is plenty for a generous three-tier cake, with a few spare to tuck into a changing bag.
Step 3: Gather the rest of your kit
Everything else is probably already in your kitchen drawer:
- Small elastic bands (lots of them)
- A sturdy base, such as a cake board, a tray or a cardboard circle
- Something for the middle, like a rolled-up towel, a tall bottle of baby wash or a cardboard tube
- Ribbon, about three or four metres
- A few extras to tuck in and top it off
One rule worth sticking to: no pins, no glue and no tape on the nappies themselves. Everything should come apart cleanly so the parents can use every single bit. Safety pins in particular have no place near baby things, even as decoration.
Step 4: Roll every nappy
This is the bit that takes the time, so pop a podcast on. 🎧
Lay each nappy flat, roll it tightly from the waistband end towards the bottom, and slip an elastic band round the middle to hold it. Tight rolls make a neater, sturdier cake, so take your time.
Some people roll them with the decorated side facing outwards so the little prints show. Others prefer the plain side for a cleaner look. Either is lovely.
Step 5: Build your centre and bottom tier
Stand your centre piece in the middle of the base. Now start standing rolled nappies upright around it, packed tightly together in a circle. Once you've got a ring, add another ring around that one, and keep going until the bottom tier is as wide as you'd like.
Wrap a long elastic band, or a length of ribbon tied firmly, around the whole tier to hold it together. Don't worry if it looks a bit wobbly at this point. The ribbon will hide a multitude of sins.
Here's a clever trick: use a rolled hooded towel as your centre. It gives the cake a solid core, and it's a genuinely useful gift in its own right once the cake is taken apart.
Step 6: Add the upper tiers
Repeat the process on top of your first layer, making each new tier smaller than the one below. A good rough guide for a three-tier cake:
- Bottom tier: 25 to 30 nappies
- Middle tier: 15 to 18 nappies
- Top tier: 6 to 8 nappies
Band each tier separately. That way it holds its shape when you carry it to the car, and it comes apart easily later.
Step 7: Dress it up
Now for the fun part. Wrap a muslin around each tier like a cake band, then tie ribbon over the top. Muslins are perfect here, because they hide the elastic bands, add colour and pattern, and every parent goes through them at an astonishing rate.
A patterned, high-contrast muslin looks especially pretty on the bottom tier, and it doubles as something for the baby to gaze at during tummy time later on.
Tuck small extras into the gaps between tiers. Think scratch mitts, little socks, a dummy still in its packet, or a rolled-up bib. Keep anything with small parts sealed in its packaging.
Step 8: Pop something special on top
The topper is where the cake gets its personality. A soft toy is the classic choice, but a little skincare set looks just as sweet and gets used every single day.
Gentle wash, shampoo and lotion for those first baths are always welcome, and a boxed set sits neatly on the top tier.
Finish with a gift tag listing everything inside the cake. Tired new parents won't remember there were socks tucked in the middle tier, and a little list means nothing gets forgotten at the bottom of a cupboard.
Step 9: Wrap it for the journey
Cellophane gathered at the top with a big bow keeps everything clean and in one piece on the way to the party. Pop the cake in a box on the car floor rather than on a seat, and maybe warn the driver about the corners. 😅
If you're making one for a virtual shower or posting it, build it in a sturdy box with scrunched paper around the base so it can't slide about.
A few final thoughts
A nappy cake is one of those gifts that's as fun to make as it is to receive. It's a lovely group project too. Get a few friends round, split the rolling between you, and you'll have it finished in half the time (with twice the gossip).
Most importantly, it says something every parent-to-be needs to hear: "I've thought about the bits you'll actually need." And that's the nicest kind of present there is. 💛
Ready to Create Your Baby Registry?
Start your free baby registry today and share it with friends and family.
Get Started Free